Dr. Seuss Playroom
- 60poundsofpancakes
- Jan 29, 2019
- 4 min read
Updated: Jan 31, 2019
Create a fun and creative play space, while containing the chaos!

We have a bonus room in our home that we decided to make the playroom. It's a large space to give over to toys, however, it did eliminate the living room being filled with toys and spilling over to the rest of the house. And since that's the first thing guests would see, it was well worth it!
There are two schools of thought when picking a paint color for a space. One is go neutral and then layer with accessories in your accent color. Two, make the color on the wall the focal point. I opted for door number two! Our home is filled with neutrals so in the kids' spaces I like it to be fun and bold. So off I went with a turquoise blue color for all the walls. It was fun to use crazy, bold colors for a change.
Creating a space that was fun and creative, while having a nook for quite time and reading was important. And lets not overlook the need for lots of storage!
There is a nook in this space that we decided to make into a reading spot and a place for quiet time. In this area I wanted to play up the Dr. Seuss theme. It's really the only spot in the room that is super Seussical. All other areas are themed with art or things that can be removed from the wall and easily changed when the time comes.
On the outside wall of the nook I freehanded a frame around the opening with a piece of chalk and painted it in with yellow paint. The beautiful thing about Dr. Seuss is the more imperfect, the better. A playroom should be filled with whimsy, not perfection. On top of the frame I painted the words, The Lorax. I was able to use small sample sizes of paint for the yellow, orange, pink and dark blue colors used on the mural, which was a nice savings. Don't forget about sample sizes for small projects, you don't always need to buy full quarts.
Next, I freehanded some rolling hills inside the nook and painted them green. I'm not an artist. I can't emphasize that enough! Just use chalk or pencils to draw your scene and if doesn't work, wipe it off. Paint is easily painted over, too, if you don't like something, just try again. Sometimes you just have to go for it! I didn't have a plan in mind for how I wanted this nook to turn out. I knew I wanted the Lorax and truffula trees and had plenty of inspiration from books. So I painted sky and hills and then just filled in the blanks.
We do have an old fashioned over head projector which I love to use for painting projects (hence, not an artist). I can make a transparency and project it on the wall and it's basically coloring at that point. There wasn't room, however, in this space for my overhead to work. I was able to use it for the two large trees, then everything else I had to freehand. I found some simple images on the internet that I liked, so I printed them and used them as a reference to draw the Lorax and the fish. My first attempt at painting the lake and fish were terrible, so I painted over it and tried again! If it didn't work, I just would have painted it green and left it as grass. Don't drive yourself crazy trying to be perfect, just make a fun space for kids!

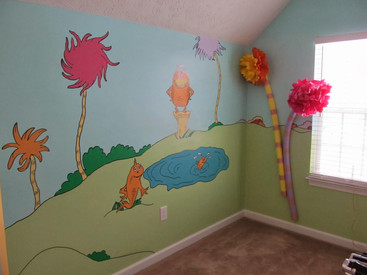


Once finished, I used a black sharpie paint pen to outline everything and give it a finished look. This is a really nice touch and since it's a pen, it's easy to add details to pictures. It also helps give the mural some depth. Since I'm not an artist, giving the mural some depth perception was tough.
Everyone loves Dr. Seuss, it's perfect for a boy or girl!
We filled in the space with some DIY floor pillows, toy storage and book shelves. The toy storage is the Trofast line from Ikea. It holds a ton and is so sturdy. Kids can climb and sit on it and it holds up beautifully. For the bookshelves we used rain gutters. There are lots of tutorials on Pintrest on how to make a rain gutter shelf, but it's fairly simple. Just purchase the gutters, along with the caps, at your local hardware store. They can be cut to length with a hand saw (or my husband used his table saw), then add the caps to the end. The cuts don't have to be perfect because they're not seen once the caps are added. Then screw the gutters into the wall. We were able to make three shelves for about $20! They are great for storing stuffed animals or other toys.

The rest of the room was accessorizing and organizing. Two things I love most! We created a large chalk board on the wall using black chalkboard paint and then framed it out in a bit of trim. For the chalk holder we used an Ikea Ribba photo ledge and cut it to length. I then just touched up the cut end with white paint. Keep in mind that chalk is very dusty! I didn't realize what a mess having a chalk board would be. Our daughters love it and it just requires a bit of vacuuming up the baseboard below it once in a while.

After searching online for vinyl Dr. Seuss quotes, I decided to just paint it myself. Here's where the overhead projector came in handy! I found a quote I liked and printed it on a transparency, then was able to draw it in with a paint pen. A vinyl decal would have cost about $40, this was only the cost of a $3 paint pen.
For the last bit of storage we needed we added an Ikea Expedit shelf and filled it with red bins. You can never have too much storage in a playroom! And for some inexpensive accessories, I purchased some letters to spell "play" on the wall for less than $10. I also bought a Dr. Seuss book at the Goodwill, cut and decoupaged the pages over a canvas.


So there's our playroom in a nutshell. Of course, it's always messy and I pushed toys out of the way to get some of these pictures, but I'd rather have a creative play space that's well loved than a show place!


Comments